
Intro to Broad Edge Flourishing
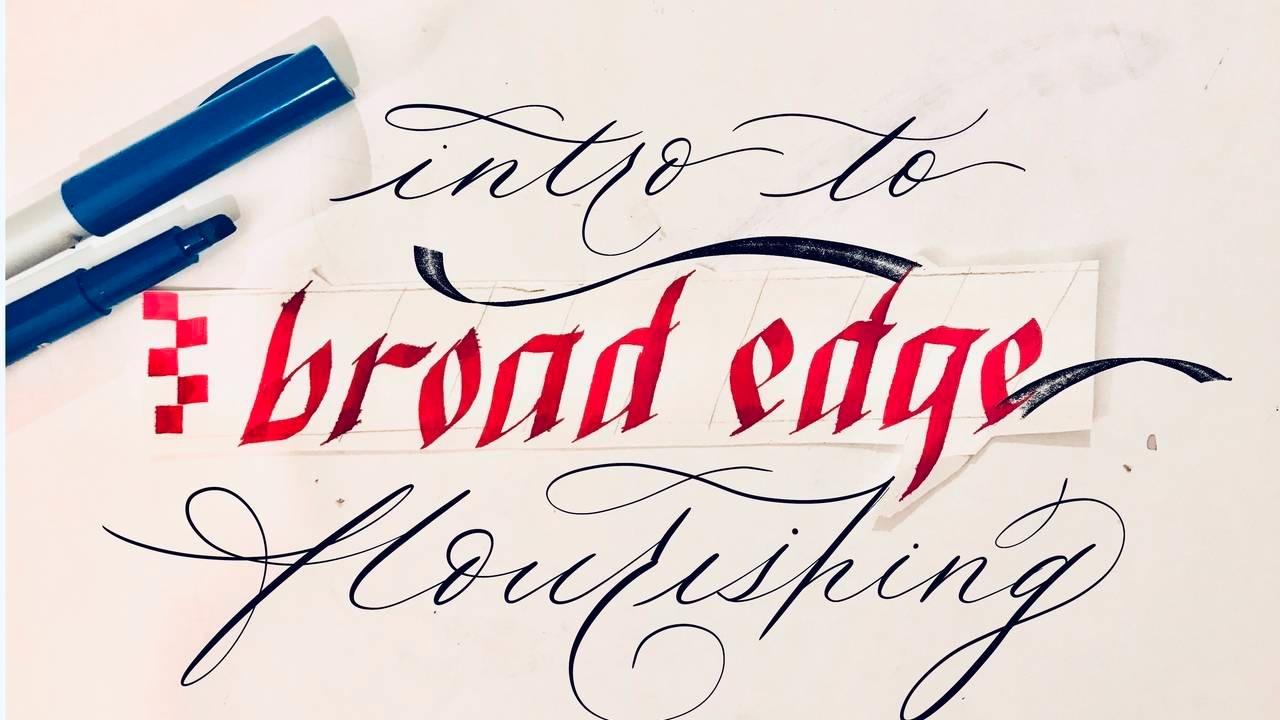
Did you know that flourishing can be adapted to broad edge calligraphy? Flowing flourishes can be added to seemingly rigid broad edge hands to add flair and creativity. We'll learn to follow the rules and then find ways to approach them from our unique viewpoint.
Using Italics & Hebrew foundational hand, we will exercise our flourishing muscles and learn to write our names or favorite phrases in a beautiful and decorative way.
Come as a newbie to flourishing and broad edge or as a seasoned flourisher and find the unique ways that the broad edge tool can enhance your calligraphy.
Concepts & Skills We'll Cover:
- Italic calligraphy
- Hebrew foundational hand
- flourishing exercises from simple to complex
- best practices for successful flourishing
- manipulating the broad edge pen nib for various flourishing styles
- White space, balance, symmetry
- Breaking the rules
Want to join us for class? It's offered on-demand and available now for all Tier 2 students. Some classes are also avai...
Writing Broad Edge Neuland
Neuland is a German typeface that was designed in 1923 by Rudolf Koch. Because he designed it by directly carving it into metal, the original had a great deal of variety between sizes. I personally love this script because of how expressive it is and how easy it is to play around with it and the different forms of supplies you can use. I drew inspiration from the Neuland typeface and a few exemplars that I have studied from and created a fun way to learn Broad Edge Neuland using parallel pens. We will be staying with 0 degree and 90-degree pen angles, so those who have never tried broad edge calligraphy before will find it relatively easy to learn this script.
Want to join us for class? It's offered on-demand and available now for all Tier 2 students. Some classes are also available to Tier 1 students. Click here to see the Tier 1 Class Listing.
How to Access Your Members-Only Class:
- Go to www.kallicampacademy.com
- Log in to your account
- Click on Classroom
- Click on Tier 2
- S ...
Center Formatting Your Calligraphy Projects
Ah, the joy of centering your calligraphy projects. Well, it will be fun after this lesson. You will learn a few key techniques that will help you to successfully align your work while alleviating some frustrations that can come from creating a written masterpiece.
Topics Covered
- Center formatting your work
- Creating guidelines for your project
- How to critique your work from draft to finished project
Want to join us for class? It's offered on-demand and available now for all Tier 2 students. Some classes are also available to Tier 1 students. Click here to see the Tier 1 Class Listing.
How to Access Your Members-Only Class:
- Go to www.kallicampacademy.com
- Log in to your account
- Click on Classroom
- Click on Tier 2 -- Class Archive
- Click on Calligraphy Critique and Layout
Materials Needed
- Your choice of quote, poem, or saying at least six to ten lines in length
- Your choice of nib and nib holder, brush calligraphy pen, or marker
- Ink of your choi ...
How to Digitize Calligraphy
Being able to digitize your calligraphy is a vital skill to have if you want to start making reproductions of your work (like cards or wedding stationery!). Being able to drag your calligraphy, move script around, and even change the color will allow you to take your calligraphy to new places!
Topics Covered
- Scanning your work into the computer and opening it in Photoshop
- How to prep your scanned in file in photoshop
- How to delete the white paper background so that you can create moveable script
- How to separate script so that you can move different words and letters independently.
- How to change the color of script
- How to insert your script into another photo
Want to join us for class? It's offered on-demand and available now for all Tier 2 students. Some classes are also available to Tier 1 students. Click here to see the Tier 1 Class Listing.
How to Access Your Members-Only Class:
- Go to www.kallicampacademy.com
- Log in to your account
- Click on Classroom
- Click on T...
Painting With Walnut Ink
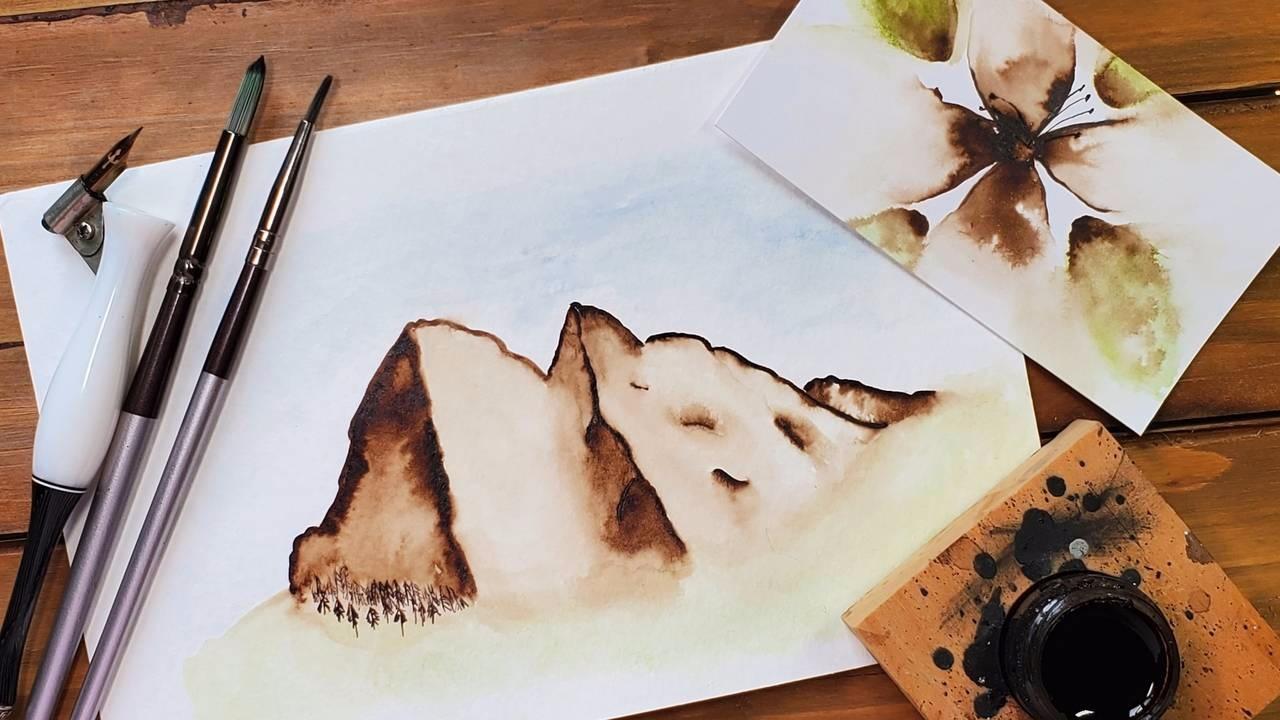
If you think painting with watercolor, acrylic, or oil-based paints is fun, wait until you try painting with walnut ink. It's a beautiful medium to work with and so versatile.
Topics Covered
- Making walnut ink from walnut ink crystals
- Various ink painting techniques
- Painting a simple landscape
- Painting a flower
- Creative ways to write with walnut ink
Want to join us for class? It's offered on-demand and available now for all Tier 2 students. Some classes are also available to Tier 1 students. Click here to see the Tier 1 Class Listing.
How to Access Your Members-Only Class:
- Go to www.kallicampacademy.com
- Log in to your account
- Click on Classroom
- Click on Tier 2 -- Class Archive
- Click on Watercolor and Painting
Materials Needed
- pointed nib
- oblique or straight nib holder
- variety of round paint brushes, small to medium size
- small paint palate or small plates or bowls
- walnut ink
- watercolor paints, optional
- pencil
- two glasses of water
- p ...
Intro to Hebrew Calligraphy
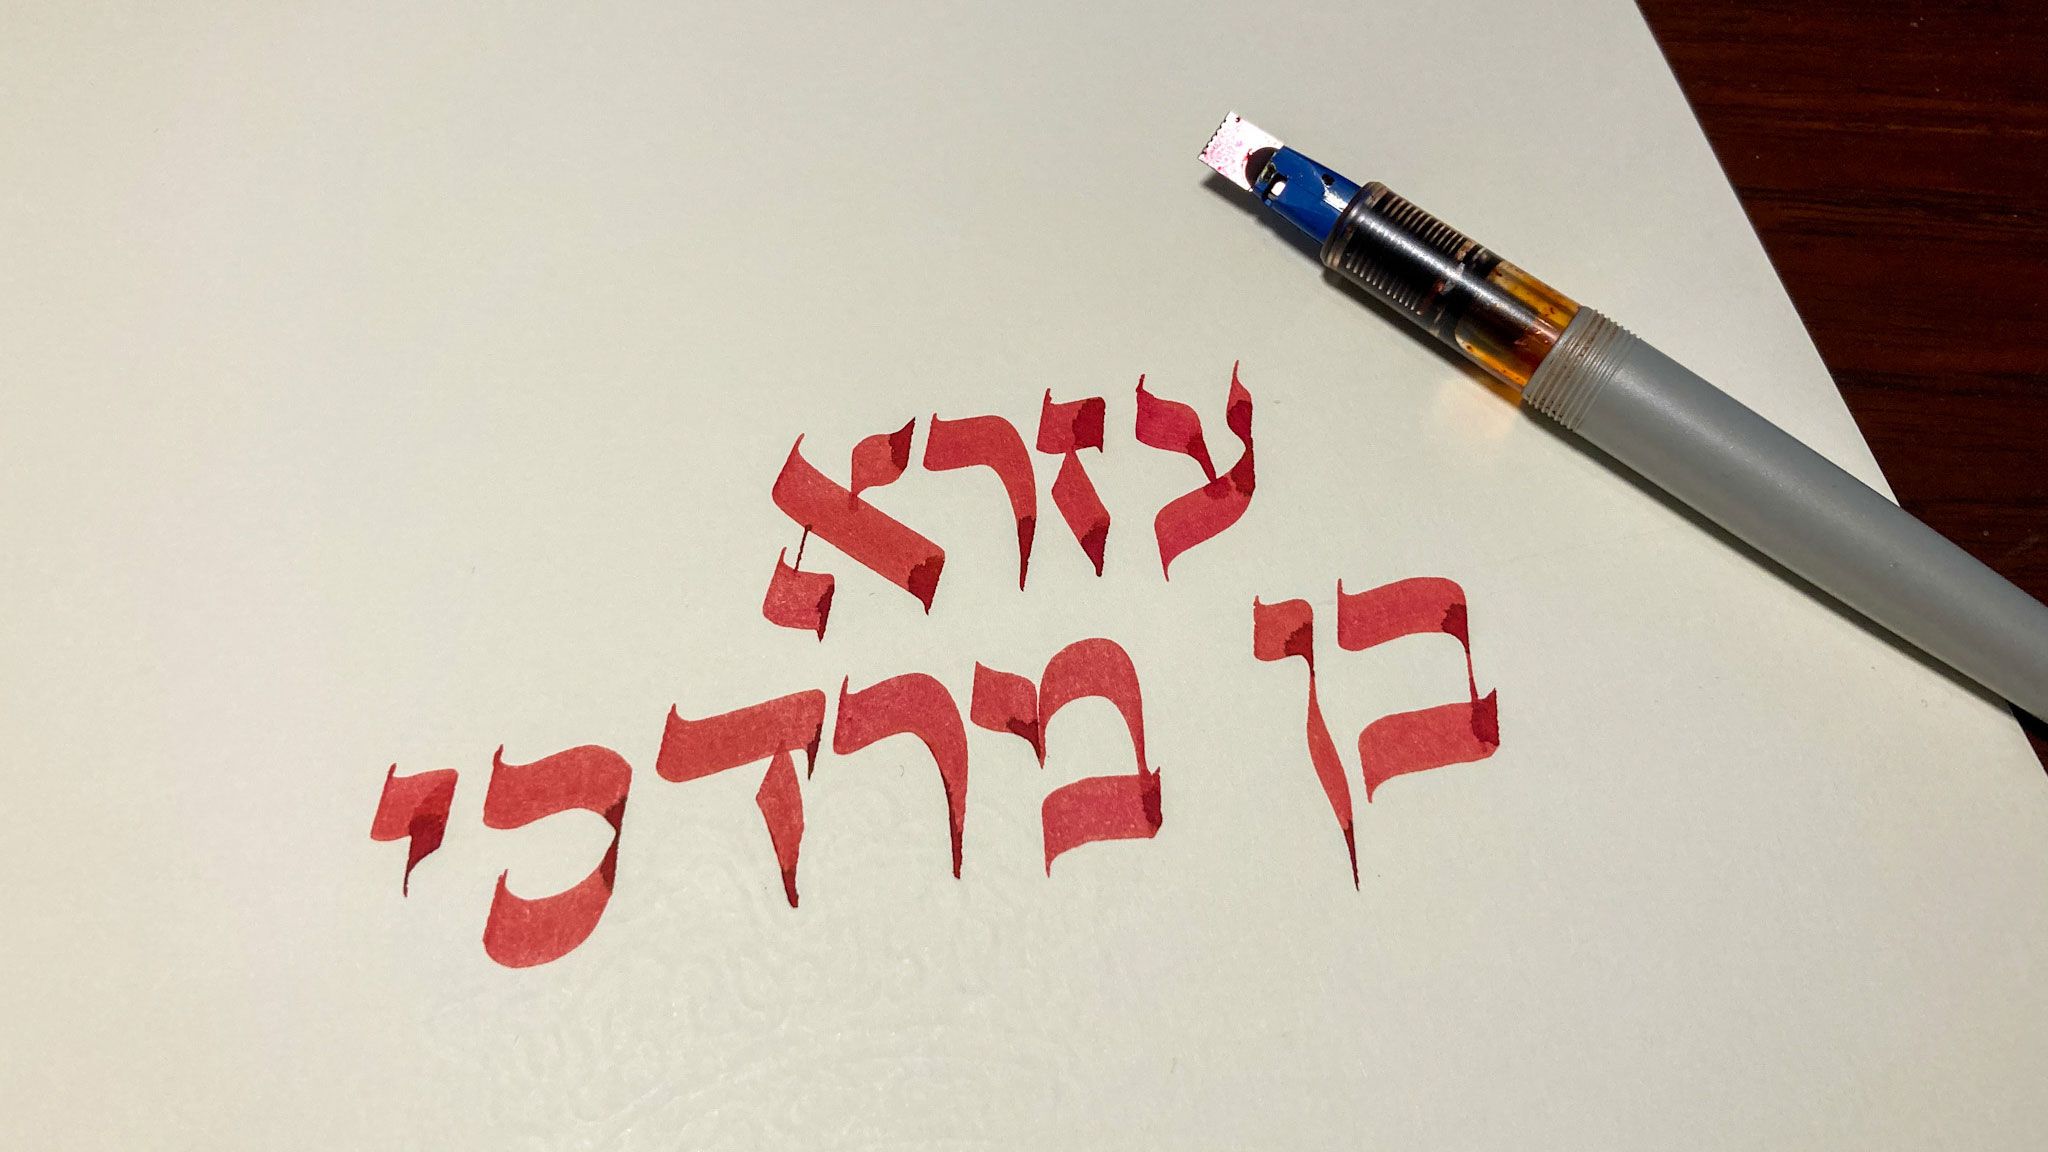
Now that we've learned how to make a Hanukkah card, let’s boost your confidence when it comes to writing Hebrew letters. In this class, Ezra Feller will teach you a foundational script, which will give you a better understanding of how the Hebrew letters are constructed, so that you will be able to give them your own personal touch. Anything goes, as long as the basic structure remains recognizable and legible. I will also show you one variation of each letter.
Want to join us for class? It's offered on-demand and available now for all Tier 2 students. Some classes are also available to Tier 1 students. Click here to see the Tier 1 Class Listing.
How to Access Your Members-Only Class:
- Go to www.kallicampacademy.com
- Log in to your account
- Click on Classroom
- Click on Tier 2
- Scroll to Current Classes
Materials Needed:
- Pilot parallel pen or a broad edge nib (Speedball LEFT handed nib if you are right handed)
- Pencil
- Straight edge ruler
- A protractor for when you ...
All Things Snail Mail - From Postage to Envelope Liners

Sending old fashioned letters through the mail is a beautiful way to use your calligraphy. It brings joy to the receiver, and is relatively inexpensive! It can be so much fun, but you can't necessarily just stick any stamp on any envelope... different ink requires different postage amounts as does different weights, sizes, and even lumpiness! Then what do you actually put into the letter? It may be easy to write a page (or four!) to your best friend, but what if you want to send mail to someone you don't know well (like in the KCA Snail Mail Database)? I have you covered in this class.
Topics Covered
- Postage- how much it costs to mail a letter and what costs extra
- What to put inside the envelope, especially if you don't know the recipient well
- Some formal etiquette do's and don'ts
- How to make an envelope liner
Want to join us for class? It's offered on-demand and available now for all Tier 2 students. Some classes are also available to Tier 1 students. Click here to see the ...
How to Create and Sell Santa Letters
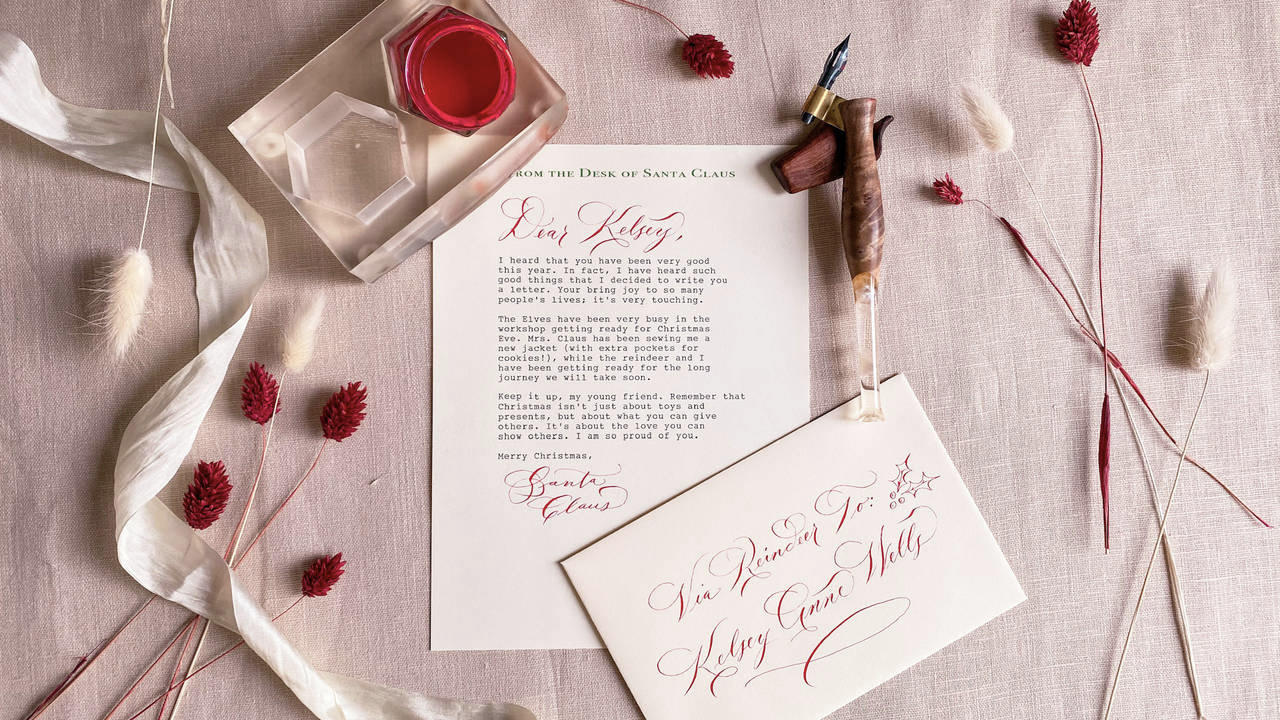
Have you ever found yourself wondering how to make a little extra money with your calligraphy around the holidays? We are going to talk about one of the best (and one of the easiest) ways calligraphers can earn money for Christmas and that’s Santa Letters. In this video, Allison will go over all the basics of how she puts together these Santa Letters and some things to think about to make selling them a bit easier. The tips you will learn in this class will help you in any situation where you are doing live calligraphy and selling items, like at a craft fair.
Topics Covered
- How to Make Santa Letters
- How to Price Your Santa Letters
- How to Do Live Calligraphy at a Craft Fair
- How to Use Gouache for Calligraphy
Want to join us for class? It's offered on-demand and available now for all Tier 2 students. Some classes are also available to Tier 1 students. Click here to see the Tier 1 Class Listing.
How to Access Your Members-Only Class:
- Go to www.kallicampacademy.com
- Log in...
Download our Master Supply List FREE when you become a Friend of the Academy.

Categories
All Categories